

Resources:
Savvy Schedules Freebie (Free)
Mini-Schedules & Task Analysis (Website) (TpT)
Previous Resources:
Outside Resources:
In the past few steps, we've laid out our physical structure and daily class schedule (master schedule). These two things help students understand the environment and the relationship between activities.
The Work systems we put in place also help students understand cause and effect. Routines, visual organization strategies, visual clarity, and visual instructions help the student understand relevant information. It clarifies what to do and how to approach the task. These forms of structure, as you'll see are used at all developmental levels. They do not restrict the curriculum but enhance learning. More importantly, schedules will increase student confidence and independence.
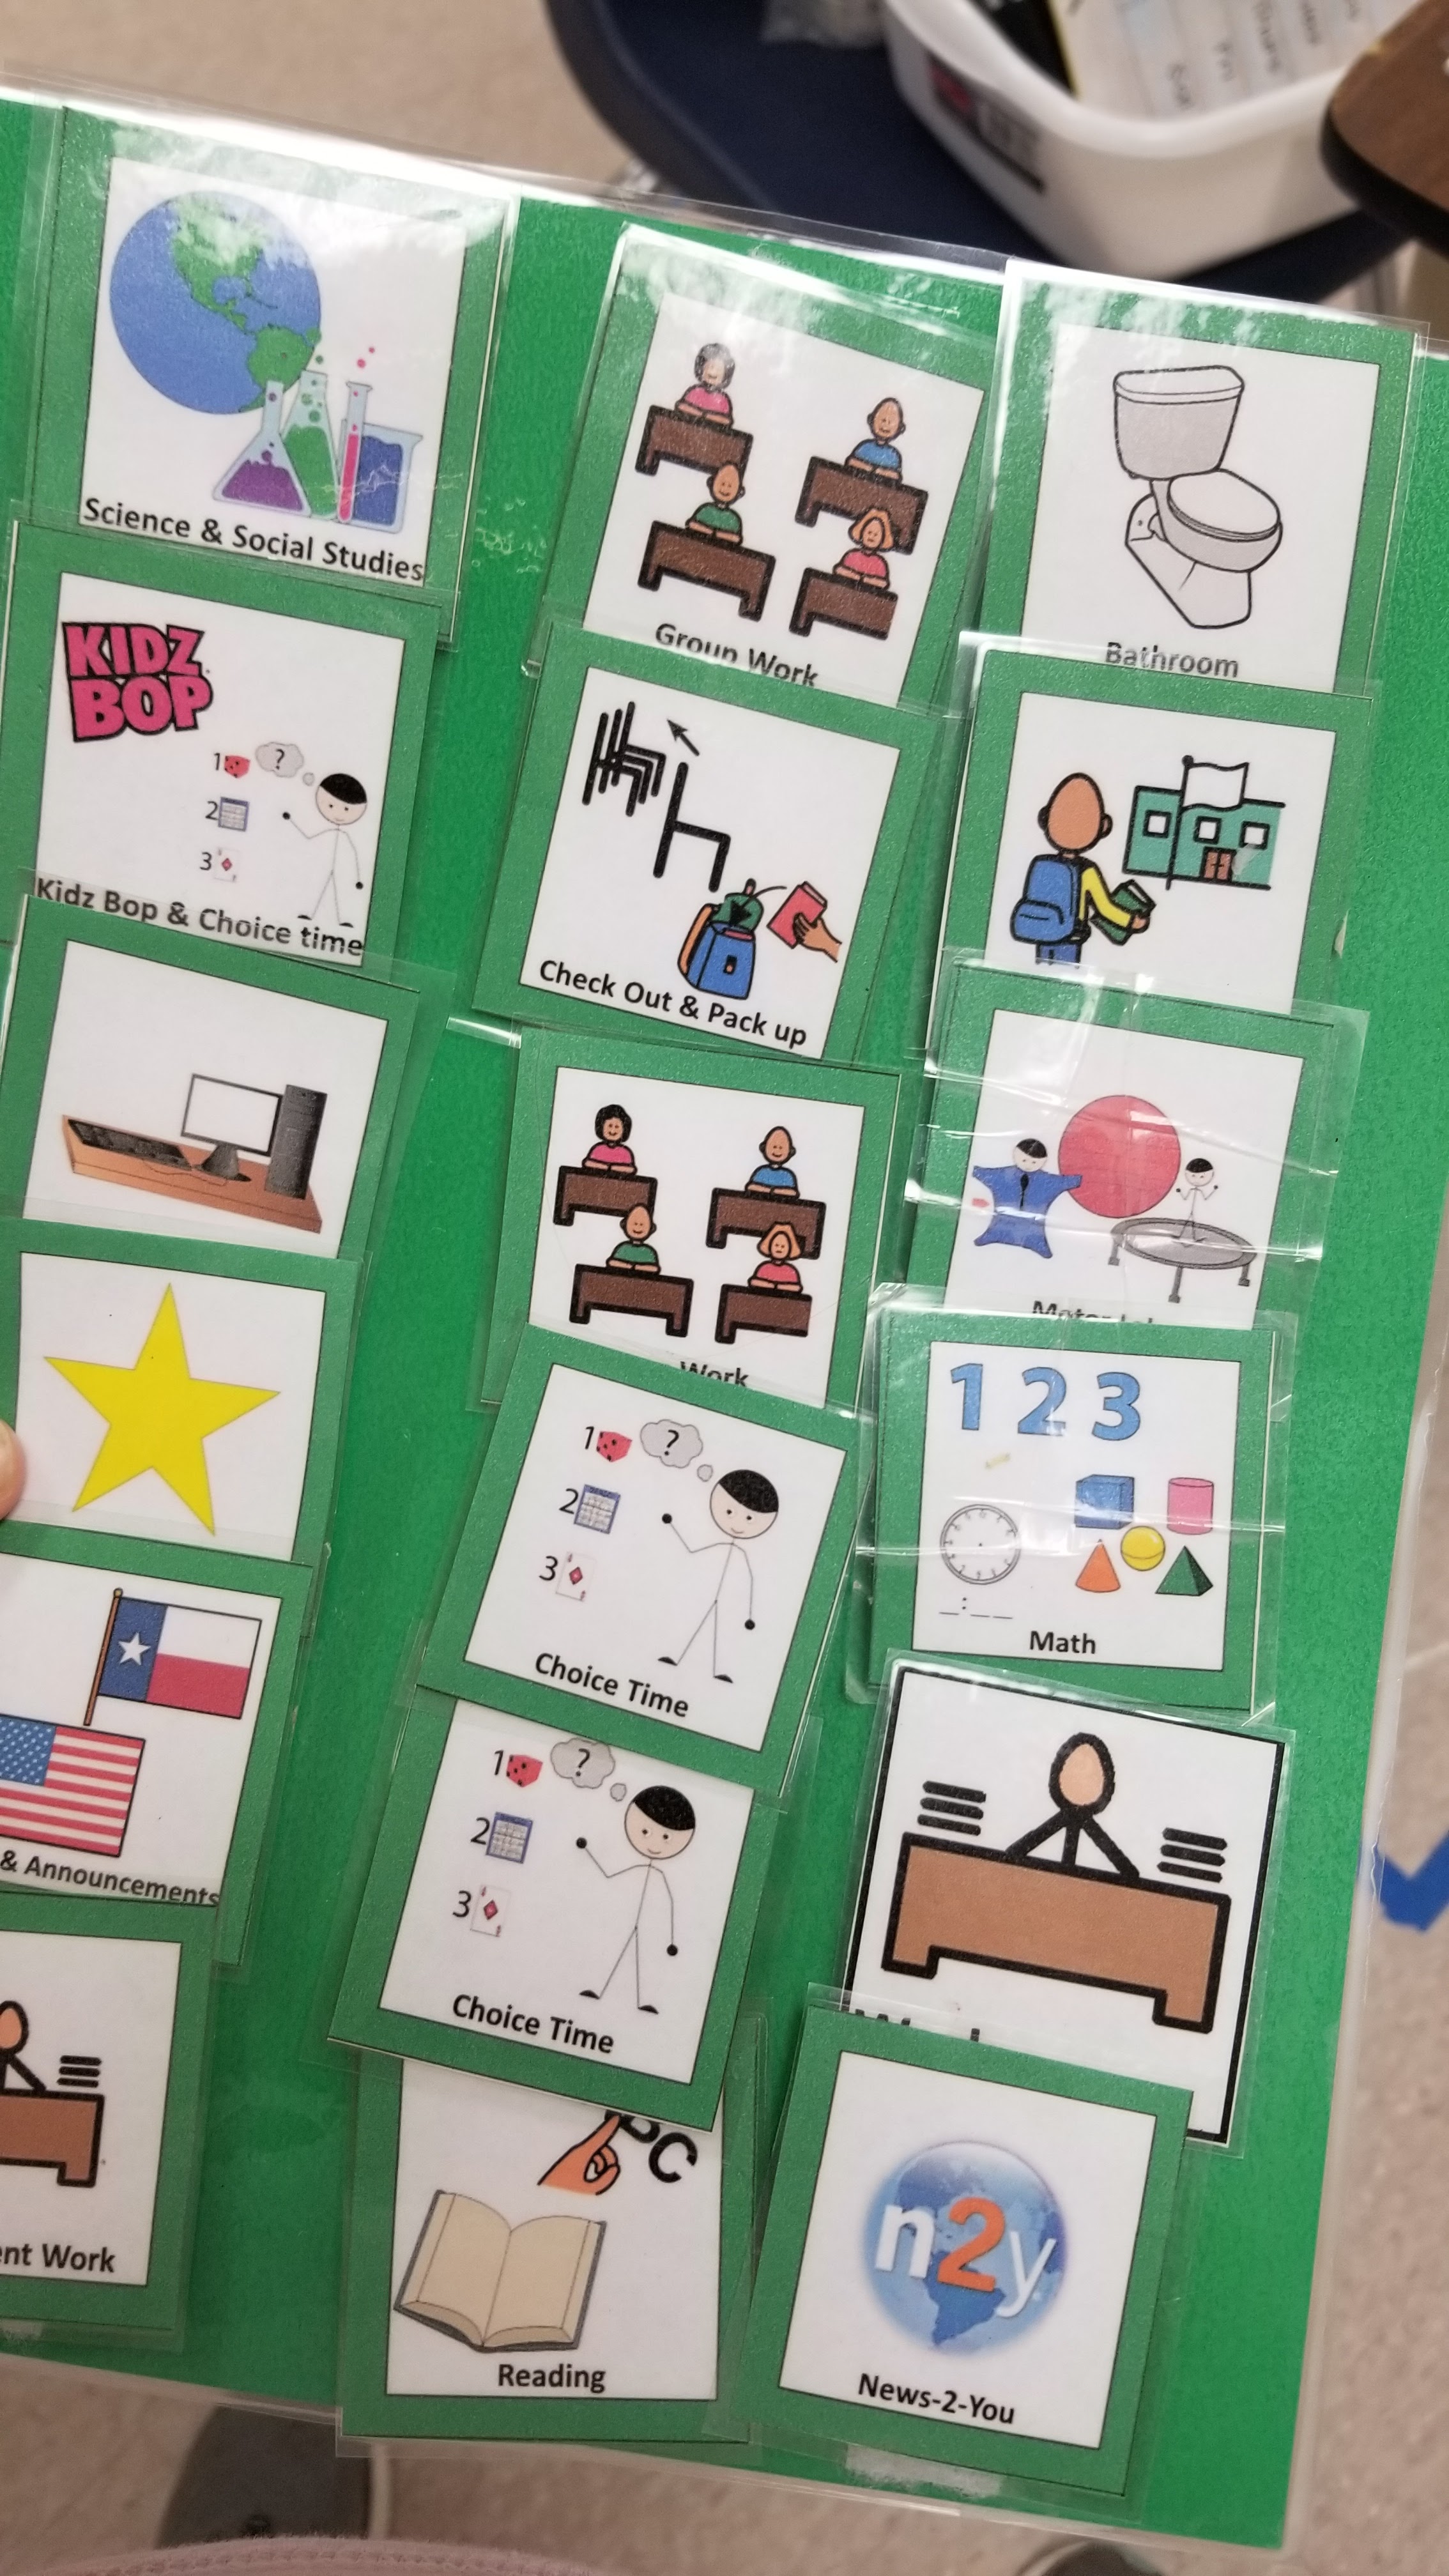
The purpose of Step 3 is to plan and create a schedule for each child that fits their needs. The student should be able to understand and manipulate their own schedule with minimal prompting. We will also develop matching staff schedules.

Because our students are not able to troubleshoot like we can, we need to help them be successful with a schedule. We may have students that can use a simple one-page schedule that lists all the items for the day. Usually, the least amount of prompting is needed. Then again, you have students who can only handle one or two steps of information at a time or one tactile object. Which requires heavier prompting and staff involvement with this scheduling system. We also, all need to see the big picture or master schedule - which is why we created it in step 2.
When creating individualized schedules, ask:
When am I going to be finished?
When can I eat?
When do I get to go home?
You get the idea...
When I start creating student schedules, I focus on one student at a time. The ones that have more non-negotiables, or need the most support take precedence. I look at the master class schedule (created in step 2). Then, for each student, fill in the non-negotiables in conjunction with the master schedule & their IEP schedule.

So you'll end up with 3 levels of schedules. A detailed staff schedule. Then, each student has an individual schedule. Lastly, a visual class schedule. The visual class schedule is large visual icons (download from week 2). As the activities finish, staff or students can either cover them with a checkmark, put them in a finished spot, or flip them over when the activity is complete. This activity to manipulate the class schedule is a great job for a helper!
Once I get the big 'activities in place' such as 'eating, specials, academic subjects, etc.' I start planning the individual rotations around the classroom. Each student will complete a motor or sensory activity, group work, 1:1/teacher, and independent work before having a break. This makes up 1 hour of an instructional block. Then rinse and repeat for each subject, to the best of your ability.
Continue this process for each student until you have as much schedule planned out as possible.
How will the students know what to do?

Use my "savvy schedule" download to determine which one fits each student's needs. Also, use the workstation planning tool from step 1 to help keep your schedule planning focused and on track. It's okay if you have different schedule types in your class. Each student might be on a different schedule type. Yes, it's more work, but if you provide the correct schedule, it allows them to be as independent as possible. Which reduces problem behavior and decreases unnecessary prompting and prompt dependence. You can utilize different student schedules together because they are all aligned under the umbrella of your master schedule.
The schedules, like the workstations, should be created with the same motion: Left to Right, top to bottom. The different schedule options that I use in my class include:

- TOO - Tactile, Olfactory, Object
- Visual - moveable pictures
- Visual Checklist
- Time checklist
- First-Then
- Parking Lot (also visual, but kinesthetic)
- Dry Erase (list)
- Paper (list)
For each schedule type, they will all be cued with 'check schedule.'
Check schedule!What does your schedule say?
The students will learn the schedule is telling them to do something. Even though the staff is the ones behind it. It's more difficult to argue with the schedule. Schedules don't argue back. Schedules can't give attention or change their minds like staff do. (Check out how to sabotage a class). I'd also note, when planning your schedules, including how you're going to handle a 'surprise' or 'schedule change.' I usually have an icon and we start changing one thing in the schedule as soon as possible so they get used to what that icon means.


When the 'check schedule,' visual cue is presented, they will know (in time) to check their schedule. You can keep it generic with color, shape, or checkmark. Or customize it with the child's favorite reinforcer. For example, if the student really likes Peppa Pig then you can make a Peppa Pig icon. Then when they 'get their icon,' they'll learn to go check their schedule and see what's next!
Indicating Next / Finished:
Once they check their schedule, what do they do?
For adults, we show 'finished' in different ways. If you're on a digital calendar, the item gets grayed out after the event happens, or a line gets crossed through. If you're on a paper calendar, you may check off the activity or cross it off. You may even have an awesome system with your own notation that you've completed that item. If you're a sticky note person, you crumple that thing up and you toss it in the trash, which feels great!
Indicating 'finished' also needs to be student specific. If the student is not able to manipulate Velcro, pick up Velcro, move velcro, or flip items over, you may want to look at object schedules. Or reducing the schedule list to half a day to reduce overwhelm.


How do we build 'finished' into their schedule? Ask if the students can:
-Cross off the task?
-Check off the task?
-Cover the icon or flip the icon over?
-Take the icon and put it in a finished location?
-Take the icon and match it to the location/activity in a parking lot or envelope?
Also, brainstorming choice boards reinforce what the student should be doing. The purpose of the choice board is so the student makes a choice of a preferred activity to do after completing the expected activity (or rotation of activities). Only offer choices that are available AND desirable for the student. The choice board options can be used in conjunction with a first then, or the mini schedule system you set in place (more on that below).
An example of a choice board in use:
Autism adventures of room 83 has a great example of a rotation task analysis with reinforcement built in. She has 3 color-coded tables. The students must go and work at each table, earning a colored clip. Once students have collected all 3 colored clips, then it's time for a break/reward. This works great for staff to 'dismiss' the students from the area by giving them the clip before moving to the next rotation. This method is similar to a token board strategy. Students get tokens for 'x amount of work, then they receive their reinforcer at the end.
About Token boards:
•Token: a symbolic representation of reinforcers (immediate) such as tokens, tickets, clips, and school currency.
•Back-up Reinforcer: actual reinforcer (delayed reinforcement)
•Promotes the student's demonstration of the desired behavior a certain number of times in order to receive a desired activity or item.
•To protect the integrity of the system, the tokens must only be earned for the demonstration of the specific behavior.
First-Then boards could also be utilized in each individual station, with reinforces put in place before switching to the next station (where they will have the first-then again, with a different activity).
A little about First-Then Boards:
•It's a proactive resource to motivate or encourage the student.
•ONE expectation is given at a time unless the student can handle an intermediate (first, next, then)
•First-Then's reduce prompt dependence when redirecting a student that is off task or refusing to work.
•FIRST - Expectation ( example: FIRST - Clean up)
•THEN - Desired Activity ( example: THEN - Read a Book)
•NOT USED AS A SCHEDULE, but as part of the schedule to reduce expectations. Use a full or half-day schedule, then break it into first-then's. (First - Reading/Then - Math), Then 'then' serves as a reminder of their reinforcement. First 1 page, then tickle.

For students on a visual or tactile schedule, color code visuals as much as possible to keep schedule pieces distinct between students. Also, have plenty of extra visuals handy. I always have extra lunch, bathroom, and specials visuals. Keep an extra set easily accessible, so you can always have the visuals, even if you lost one, or stuck it in your pocket and washed it in the washing machine. For students who don't have interactive visuals, you can color code the checklist or dry erases schedules paper, or have different colored folders/binders.

Once you've determined the type of schedule for each student, "check schedule icon" and choice board, it's time to brainstorm the task analysis between each activity. The TRP handbook in step 2 can come in handy with the steps already laid out.
When I start talking about task analysis, it reminds me of nesting dolls. The campus schedule is the big doll. Then the master class schedule is the next smallest nesting doll. Then each individual student and staff get a schedule. That makes layers of dolls there! Then, the itty bitty doll on the inside is the mini-schedules / task analysis. The task analysis is the backbone of all the other schedules. It allows the students to follow the instructions within their schedule. Which is within the class schedule, which is within the campus schedule! Whew. hope that made sense!

Have the task analysis (workstation steps) you want the students to complete easily accessible or visible in each area. The steps can be hung as a reminder on the bulletin board. Or you can have individual instructions printed and laminated on a card. There can also be interactive picture schedules to follow. These would be the mini-schedules that the students use within each subject/time frame/activity. Think of it as a schedule within a schedule.
A few questions to guide the task analysis:
Where do I go?
What work?
How much is coming?
How much work?
How to know when finished?
What to do next?
Here are some examples:
Arrival mini-schedule / task analysis
-put up their backpack in the cubby
-walk to the cafeteria (this student is independently transitioning)
-get breakfast in the cafeteria
-sit and eat
-clean up, then sit at the table and wait for the bell
-when the bell rings, return to class (from here, they'll be able to check the schedule or follow a 'morning' mini-schedule to stay on task.)
- Reading example for a higher student. Reading last year was after lunch, so we're transitioning in from recess.
-Get a lunchbox and water bottle
-Leave recess
-Put the lunchbox and water bottle on the floor outside of the restroom
-Go to Bathroom & wash your hands
-Refill the water bottle
- "Check Schedule"
-Go to the assigned spot in the group
-Pick from the choice board what they're working for (during reading)
-Participate in 'go noodle.'
-Sit at your desk for News-2-You *student gets a clip or sticker*
-Independent: News-2-You Binder (find the corresponding day of the week)
You will probably have a mini-schedule here to show how many tasks and which ones should be completed.
-Silent read or play with fidget until 1:1 / teacher work)
You can have a 'finished' early choice board for students who are fast workers. Or provide extra work.
*student gets clip or sticker*
-Teacher Work
-Color, play with magnetic letters, puzzles or play dough until the timer goes off.
You can have a 'finished' early choice board for students who are fast workers. Or provide extra work.
*student gets clip or sticker*
-After 3 clips or stickers, the student gets reinforcement & break (what did they choose from the choice board)
- Here's a student math example with group work, teacher work, independent work, and breaks.
Johnny is going to do a group activity with the class and sing songs/dances about addition. *Johnny gets a clip or sticker*
Then we're going to check our schedules and he's going to do one-on-one with the teacher to practice addition.
*Johnny gets a clip or sticker*
Then he's going to check his schedule again and go to the independent. Remember independent work are skill he's mastered. If he's adding, we have the following tasks: skip counting, identify large/small and practice writing numbers, etc... These are all mastered skills. They don't have to support the addition goal, but it needs to be skills that he's mastered.
*Johnny gets a clip or sticker*
So each of those rotations (between 'check schedule') is going to be 10 to 15 minutes. If the timer hasn't gone off and he's done, have extra work or 'fun fillers' for kids to do. Teach them the expectation: work until the timer goes off. Also, teach them when the timer goes off, it's okay if they're not done. We'll start there tomorrow, or build in 'makeup' time where students can finish work.
To help with each station, use the Workstation planning tool from Step 1 to remember all the components.
What do staff do while all the students are maneuvering stations and areas?
-Staff are preparing work
-Working with students
-Monitoring students
-Collecting data on student goals and behaviors
-Praising and reinforcing wanted behaviors.
With all the student schedules set up, it's time to assign staff. You probably grouped certain students together based on their needs, levels, or goals. Determine which staff are going to be in what zone to provide support for your students. No para should be assigned to work with the same student on a consistent basis. It's best if you can rotate students with different staff throughout the day.
Just like the student schedule, I create staff schedules.
I use the master excel sheet and fill in who, what and where the staff needs to be.
- For example:
Support Staff: Mr. A
9:10-9:50
Art rm 100
Students: Jill, Ann, Elaine
Their entire schedule is built to see where they will be, what students they will have and the length of time they will be supporting them. If I need to tweak (which I always have to at some point), it's easy to go back into the excel sheet and move students or staff around, reprint the new schedule, and display it in class. Then we update student schedules, respectively if there were any changes. We also prepare them for that change with a social narrative and the 'surprise' or 'change in schedule' icon.
But, I have kids that can't stay focused for 1 minute?
Keep them on the schedule. When you're doing the morning meeting, they're in with the group, participating as best as possible. But you can build in more reinforcers, for example after each page in his/her calendar book, he gets to stand up and pace for 30 seconds or jump on a trampoline for 1 minute or gets tickles for 15 seconds. We'll talk more about sensory needs in the behavior support step.
How do I support a range of kids that are so different and some can't participate?
They also stay on schedule. Every child needs to be held accountable and has expectations to follow their schedule. They also like to feel included with their peers and group. Every activity throughout the school day should be differentiated.
For example, during reading center some students are working on comprehension, some working on sight words, and some listening to a story on a CD. THEY ARE ALL AT THE TABLE WORKING ON THEIR READING GOAL AT THE SAME TIME!
For math, one is working on shapes, another time, and 2 with money. The 2 with money can do small group activities. The students working on shapes and time, could both do a 1:1 for direct instruction on those skills. We'll talk more about multiple goal activities at one time during the Curriculum step.
Let's get to work:
1. Gather your IEPs / profile sheets
2. Get your master schedule, class floor plan, and zoning plan
3. Use the resources provided to create individualized schedules for each staff and student:
Savvy Schedules Freebie
Individual Schedule Bundle (First-Then, Choice Board, Various Schedule templates)
For work system visuals & mini schedules, use some of the resources listed:
____________________________________________________
Thanks for joining another step of the Self-Contained Basics Course. If you want to see the full video, visit my mentorship Patreon "Kolo Says."
Grab more freebies & info on my Facebook group & email. Lastly, let me know if you need clarification, have questions, or have concerns.
____________________________________________________
>Step 4: Communication, let's get talking!
0 comments